Saturday, April 26, 2014

Costume in the making......

I have decided to show you a costume from beginning to end. All photo's owned by me except for the very last one.........that one is owned by Karen Dietrich who btw owns the costume.

 Well here is one of the tassel sets for the costume. Yea it looks a bit un-Kemp, but it did get a good brushing after I showed it to Karen for her approval. Now remember, I show pictures to all customers for their approval BEFORE going on to the next step. Unless the costume or presentation set is a "Surprise" (i.e. birthdays etc.) Karen liked the color combination. 
 Next up was the breast collar. That wasn't a big deal to show off, but I did show Karen the progress. This photo just shows the "Plain" stage. No decorations or tassels. Kinda boring thing going on. LOL
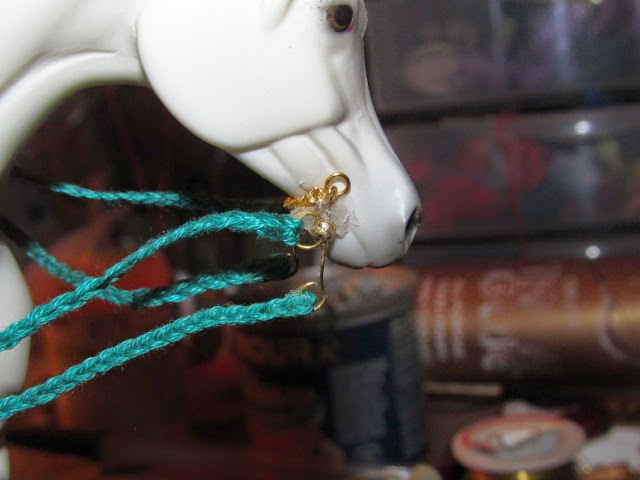
 Next on the list was the bit. Normally I do snaffle bits for costumes(I was taught that either a western curb or a snaffle bit was the ONLY bits used in costume by my aunt). I was shown several pictures that now days, they use either doubles or Pelham bridles. So I decided that this bit style was it. Making this bit brought on some serious eye twitching. And yes I did notice that one was a wee bit bigger than the other........so I changed it out. I think I went through 8 rounds of constant measuring when I finally got the right match. 
 Here we finally have the bit done and the curb chain attached. Surprising that a 1.5mm curb chain(bought it from Fire Mountain Gems) actually was in scale. Oh this is all for a Pebbles model. Plus I did attach one set of reins.
 Here is the same bit with both sets of reins attached. Pretty if you ask me. 

These two photo's show the workings for the costume. I did go to our local sewing shop and with the help of the owner, we found a perfect match for it. Here I had cut out the drapes(I have templates for them) and was able to line them with thread(not an easy job and messy)
The second photo shows how I laid them out to make sure it would look correctly. 
Here I started to attach some of the single tassels, but had to remove them and start over cause I miss measured ALL of them. Talk about something that is aggravating. I had to remake the tassels and re-attach. But I couldn't complain to much. I was doing this work at 2:00 in the morning

 
I normally have elastic band for traditional sized models when I do costumes for them, but none for any smaller sized models. So I improvised. I cut some off the larger size elastic and made this for the smaller size. Being a smarty pants that I am, I decided to make it more decorative. I attached this gold buckle to the girth. Plus I told Karen NOT to try to use it since it was glued in place...........LOL It would have been funny to see her try. Anyway, I fixed it to where she could "Cinch it up" LOL
 Yup that is a hook attached. Yes it is on there backwards, but I did fix that. Simply by turning the hook itself around. Oh and yes I did attach a small piece of material over the "O" ring to protect any models that the costume would be on. Worked!!!
  I finally went back to work on the bridle. Got the headstall done and the throat latch done when it was brought to my attention that the bead was just a bit to big. So I removed the bead and put a "Thread" slider on it instead. The brow band was another messy job. But IMO looks cool!!
Here I finally got the saddle and drapes all together and was able to get the correctly measured tassels on the "Butt" drape(as I call it) It was finally starting to look like a costume. Not a jumbled mess.

I had worried about the stirrups when Karen told me that she had some LB/Pebbles sized stirrups. I was like No Way!! Way, she did and sent them to me. In the photo you can see that I lined the saddle and started attaching the 2 tier tassel sets onto the drapes. I was so excited to get the stirrups, I had to attach them immediately.  
Now I had finally finished with the tassel attachment. Looks darn good.That is just part of the whole workings. 
I decided to put it all together to see what it would look like. I wasn't finished adding tassels to the right side of the collar yet. Yea I got in a hurry to see what it would look like. My bad :D

The photo's below show this costume in it's final stage before I sent it off to Karen to be shown.


You can see all the hard work I put into this cute costume. Had too, Karen scared me into working fast. She had told me that it had to be done for a show last weekend(4/19/14). Well there wasn't a show that weekend, but I did get it done just in time. She showed it this weekend(4/26/14)and I think I will let the photo speak for itself.


Friday, April 18, 2014

Refurbishing at it's best.........oh boy

Good morning again!! 

Well I have been taking on a task of refurbishing a costume for a friend. Man this one was a disaster. I haven't finished it yet since I had to finish another costume for another friend. At least I can work on this one and can't wait to see the fullness of it when I am done. Here are the photo's of the costume BEFORE I received it. Be forewarned...........it is awful!!!
 As you can see, I did post the photo itself what I was going to do, but also you can see how messed up it is. The overall costume is very beautiful, but it does have it's problems, but those are getting fixed.
The next photo shows the bridle...........O_O what a mess. LOL
 There is no explaining this. All I can say is WOW!!! Thankfully I am saving a lot of the bridle that is saveable.
Here is what the bridle looks like AFTER I did some work to it.
 See, now isn't that much better? I think so. That all gold was just way to much for it. I had to add the color so it would pretty much match the costume's coloration all together. The breast collar was a disaster and decided to scrap it all together. So Anita will be getting a new breast collar.
Now you remember what the saddle and drapes looked like before I started working right? Well here is what they look like AFTER I went nuts on them. Oh btw, I will be fixing the saddle too. :)
 Now don't that look better? I cut a notch at the top of the drape in the front so it would sit on the model better, removed all the tassels(what a mess they were), removed the girth cause it is getting a new as well. Plus I braided thread and attached it to the drape. I actually love the coloration of this set. Thankfully I have both colors in thread. There will be double tier tassels on the side drapes and on the "Butt" drape, there will be a single row of tassels that alternate the colors Burgundy and blue. The saddle will be re-done with the same color of material(may have to go to town to find it) I was looking at the saddle really close and had noticed that the person who did this, didn't do a very good job on covering it up. She left a cut mark that almost covers the whole saddle. So yea, It will be recovered. Plus the stirrups are going to be different. They were the western style, but this costume just screams for English style stirrups. So there ya have it. Oh here is another photo of the bridle...............gotta make your eyes bleed some more. LOL
Here is what the breast collar looked like...........Can I cry now?

 Yea, those tassels are out right UGLY!!!. I was able to save all the beads from this monstrosity. Plus the tassels was attacked by wire. Ok, I can see some sets using wire(mostly for action posed models), but this one was just.........I am so lost for words here. Don't worry, I will post the new tassels and breast collar when I am done with it.
Well, until laters. Enjoy your day!.

Show placings and Karen's costume

Good morning everyone! 
Lets see, where do I start. LOL  
Lets start with the good news. Another one of my presentation sets is going to NAN!!! That is so awesome too. Elizabeth Mace took her "Black Flame 3" to a live show and it placed 2nd. Not sure what costume beat it out of first place, but I am still happy that it placed. Not sure if the LB sized set I did placed at the show, but it did place at a show week before last. Here are the photo's 
 As you can see from this photo(by Elizabeth herself - used with permission)her model placed 5th. Not bad for the sets first show. I am happy though. Some people have said that the set should have placed higher. I have to agree, but it is the judges decision. I have heard from other sources that some people(will not mention names)said that the set is awful and should never have been shown. I guess those people should really take a look at themselves. Maybe they should just shut their mouths cause their opinions aren't needed. 
Here is the "Black Flame 3" first show placing. Again, it is up to the judge.
 Third isn't a bad placing. I wonder though what was the judge really thinking? If it is over the fact that the model is either a NSH or just an Arab mix, I have seen those breeds show with Arabian tack on. Oh well, to each his own.
Now here is the photo that made me very proud!
Yup your seeing right!!! The horse and set NAN'd!! So I get to see another one of my sets at NAN. Speaking of which, I won't be able to go :( Daniel says that it is to far and I have 3 dogs that would have to go. He doesn't want the responsibility of caring for them for 3 days. I even asked it was in Oklahoma, could I go. His answer? No! I think if it was held in Amarillo, I still wouldn't be able to go. Jackass he is.
   Now on to other news. Karen Dietrich is going to be a happy camper. I finished her Pebbles sized costume in time for a live show next weekend. But here is something funny about this costume. Karen gave me a rush time. She said that the show was this weekend instead of next weekend. I had the darn set done Monday and was already to mail it out when she told me that the show was AFTER Easter weekend. Talk about having a heart attack. I laughed so hard cause there was no way of knowing that she pulled a good one on me. Anyway, here are some photo's of her costume.
 In this photo, you can see it in final stage. I shipped it out just after taking photo's of it. 
Here is better shot of the bridle. Yes it is a pelham bit. or double rein'd bit. LOL A lot of real horse owners are starting to show their horses with this kind of bit. Talk about some serious eye strain when making a bit this small...........UGH. Plus I have a costume order from another friend in Chips/SM scale and she want's the same type of bit. I think I am going to go insane!!
Here is a photo of what the bridle looks like from the front. You can see the star on both the brow band and the center piece of the breast collar.
Now see isn't that a cute set?? Of course it is. Now just have to wait for the show and Karen said she would tag me in photo's. OOO I CAN'T WAIT!!!

Here is a photo of the girth attachment I decided to do for this costume. Yes it has a buckle, but that is for show only. It attaches differently to the saddle
Don't worry, I did fix that to where the hook was facing outwards and there is protection behind the works. I just wanted to show Karen the way the girth attaches so she wouldn't be trying to monkey with the buckle. Yes there is a photo of that buckle
Believe me that buckle didn't go on without a fight. I was getting aggravated by the second when I was working with it. Oh if your wondering, yes that is elastic band. I had to cut it down to be in scale with the model. I did put some sealant on it so it wouldn't fray out like I have seen some do.. 
Here is a close up photo of that eye twitching bit. Yea the one that drove me insane to get done. 
 Now isn't that some major detail? yea I think so. I will be doing a traditional size bit for another costume I am refurbishing for a friend like this one. But that is in another post. 
Well, better get that post done. Enjoy your day and remember Live like there is no tomorrow!